Paying for business headshots can be expensive, and if you are part-time or new to the insurance business or just like to do things for yourself, then perhaps you would prefer to DIY – Do It Yourself. I am not a photographer and so this article is my personal opinion. I recently saw a Facebook post of someone asking people for opinions from 5 different headshots, and there were “likes” for every one of the 5 photos, so this article is just some food for thought as you form your own opinions.
There are various options for cameras, you can use a regular SLR camera, use your smartphone, or even your computer camera, and you can have a friend take the picture, use a tripod to hold the camera, or stack some books under your computer to raise it to eye level. For most headshot photos having the camera at your eye level will yield the best results.
Natural light is great, but if taking pictures outdoors, avoid pointing the camera into the sun, the sun’s glare will not be a good effect. Yet you do not want to be looking into the sun and squinting, so perhaps find some shade or better yet take the photo when the sun is low in the sky. If using indoor lighting, there are a few instances that changing the lighting to a slight upper or lower angle might improve the results. Just experiment with your face shape.
Many articles will suggest using a ring light for indoor photos, which is nice if you already own one. But if you put some thought into location and time of day, you should be able to get a good result with natural lighting.
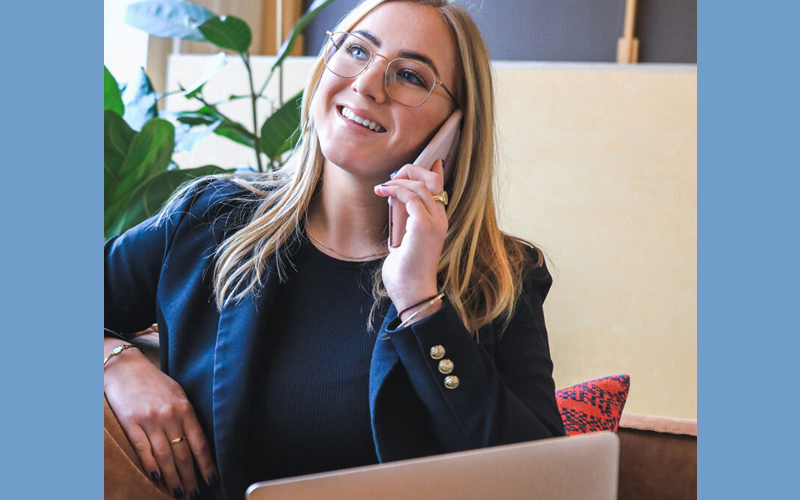
Your background, your pose, and your personal appearance, such as clothes and hair are extremely important. For many of your potential clients, your business card or letter with your headshot will be their first impression of you and remember first impressions are important. You know all this, but sometimes when focusing on the photo process we lose track of the basics.
Your attire should be reflective of who you are, your clothes should be attractive and blend with your background. You probably already know which colors look best on you, but if not, ask a friend to help you select which color outfit o try, and then take pictures of yourself in a couple different outfits, and a couple of different backgrounds, because that what a camera sees is not always what our human eye sees.
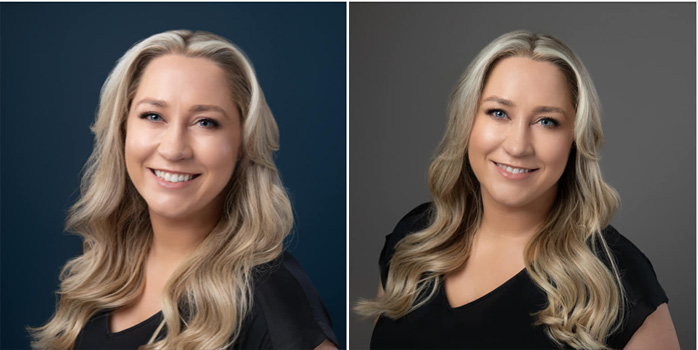
The background you use can be simply a color, or interesting to reflecting your personality. Pick colors and locations that you like and experiment with them. Take some camera shots and ask your family and friends what they like best. Don’t give them twenty images, they won’t look through them all, just select a few options to ask them to pick one. But please do not use a cluttered background showing your far too busy office or laundry room or outdoors your current yard project. In your home, clear out an area and only leave a minimal amount of decorative items, and outdoors find a location with a few nice bushes or flowers, not your shed and gardening tools.

Your pose is possibly the most important selection you will make. Crossed arms, leaning too far into the camera, a selfie look, all can be a turn-off. In the past many business poses utilized the crossed arms to look, I don’t know, maybe they thought it looked official. To my mind crossed arms make a person look smug, closed off, and unapproachable, although crossed arms can sometimes work in casual attire with a fun, smiling face. See “Reading Body Language“. And ladies those selfies with way too much cleavage might get you some types of business you are not looking for. Guys, upper body pictures flexing those muscles could intimidate potential clients. Leaning towards the camera can distort your body to face ratio, and make you look a little too hungry. Certainly, it is okay to be attractive and muscled, but without flaunting it. Perhaps just a nice, natural pose, with relaxed shoulders. A good starting place is the basic standard of your body at a slight angle to the camera, and turning your head to face the camera, but don’t get stuck on this pose, find what is natural and flattering for your face and body type.
There is a lot of disagreement as how much of a person’s whole body should be used in advertising pictures, and if pets and family should be included in business photos. Obviously, a headshot is pretty self-explanatory. As to the others, what is right for the pumpkin might not be right for the tomato. I believe that people should be themselves and do what they want, using good commonsense. Taking an insurance business photo at a nightclub in, on-the-prowl-attire is not the best idea. But using pets and family I feel should be left entirely up to the individual, not that many people in the world don’t like pets or kids. Now on the other hand, they could just not like the pet hair you might bring to a meeting, or the distraction of phone calls from kids, but again, you can not please the whole world. So my final opinion, do what you want in a tasteful manner.
Note for smart phones. It is usually best to set the phone to a basic Photo or Portrait setting, and rather than zooming in, move the phone closer to the subject for better resolution, the image can be cropped later if needed. Try using the smartphone camera in HDR or Rich Tone, and if needed you can use an HDR Camera App to help process the image, and on your computer, you can process images with a photo program like PhotoShop Elements, and there are some online photo apps that are free or low cost.
There are tons of articles about taking your own head shots for business cards and other advertising needs. Read a couple of different articles, you might get some new ideas from each one. Here is an article for posing “How to Pose and Angle the Body“. — Now go get that head shot done.
Video by AppSumo on YouTube. – Click the Image Below to View the Video.